For test-driven development, the test case always comes first. The Phone inherits the Node.js EventEmitter: a phone is a customized event emitter, only augmented with its own properties and methods.
A phone has its own name, can powerOn itself.
Since it’s an event emitter, it can emit ‘income’ event, and can set the handler by addListener as event emitter.
test.js
1234567891011121314151617181920
varEventEmitter=require('events').EventEmitter;//var Phone = require('./phone-es5');//var Phone = require('./phone-util');varPhone=require('./phone-es6');// all implementation should have same interfacevarp1=newPhone('p1');// class instantiation with parameterp1.powerOn();// invoke instance methodlconsole.log(p1instanceofPhone);// test ISA object of super classconsole.log(p1instanceofEventEmitter);console.log(p1);// print instance at run-timevarincomeListener=function(number){console.log('incomming call from: '+number);};p1.addListener('income',incomeListener);p1.income('+4478123456');// invoke instance methodPhone.vendor('xiaomi');// static/class method
In fact, javascript object is prototype-based, there isn’t class at all, everything in javascript is object.
There’s only Object Extension (extends an exists object to a new object), rather than Class Inheritance (create new subclass that inherits the parent class).
To implement Inheritance is to build/extend the appropriate prototype chain.
The prototype-based inheritance is more flexible, and it’s easy to emulate traditional textbook or java-like class or inheritance.
phone-es5.js
12345678910111213141516171819
varEventEmitter=require('events').EventEmitter;functionPhone(name){EventEmitter.call(this);// call parent's constructorthis.setMaxListeners(20);// customize with parent's methodthis.name=name;// self field};Phone.prototype=newEventEmitter();// same as: Phone.prototype = Object.create(EventEmitter.prototype);Phone.prototype.constructor=Phone;Phone.prototype.powerOn=function(){console.log('[Phone instance method] '+this.name+' is powered on.');};Phone.prototype.income=function(number){this.emit('income',number);};Phone.vendor=function(name){console.log('[Phone static method] vendor: '+name);}module.exports=Phone;
Using Node.js util.inherits
Node.js util module provides syntactical sugar for easily implemention of class-like inheritance.
phone-util.js
123456789101112131415161718
varEventEmitter=require('events').EventEmitter;varutil=require('util');functionPhone(name){EventEmitter.call(this);// call parent's constructorthis.setMaxListeners(20);// customize with parent's methodthis.name=name;// self field};util.inherits(Phone,EventEmitter);Phone.prototype.powerOn=function(){console.log('[Phone instance method] '+this.name+' is powered on.');};Phone.prototype.income=function(number){this.emit('income',number);};Phone.vendor=function(name){console.log('[Phone static method] vendor: '+name);}module.exports=Phone;
util.inherits levarages Object.create() of ES5, the inherits line equals to:
From node-v4.0, lots of ES6 features are implemented by default(shipping). Such as block scoping, collections, promises and Arrow Functions. And Class syntax is also fully supported. But, note that class is just another syntactical sugar:
JavaScript classes are introduced in ECMAScript 6 and are syntactical sugar over JavaScript's existing prototype-based inheritance. The class syntax is not introducing a new object-oriented inheritance model to JavaScript. JavaScript classes provide a much simpler and clearer syntax to create objects and deal with inheritance.
With class syntax, class/inheritance can be implemented in a more straightforward manner.
phone-es6.js
123456789101112131415161718192021
'use strict'varEventEmitter=require('events').EventEmitterclassPhoneextendsEventEmitter{constructor(name){super()this.setMaxListeners(20)this.name=name}powerOn(){console.log('[Phone instance method] '+this.name+' is powered on.')}income(number){this.emit('income',number)}staticvendor(name){console.log(`[Phonestaticmethod]vendor:${name}`)}}module.exports=Phone
Note: ‘use strict’ is required, and we use the template string syntax in static method (class method).
And class declaration (as well as let, const, and function in strict mode) cannot be hoisted, unlike var and function.
In summary, with ES6 support in Node.js v4.0, class inheritance has never been more easier. So, let’s embrace ES6.
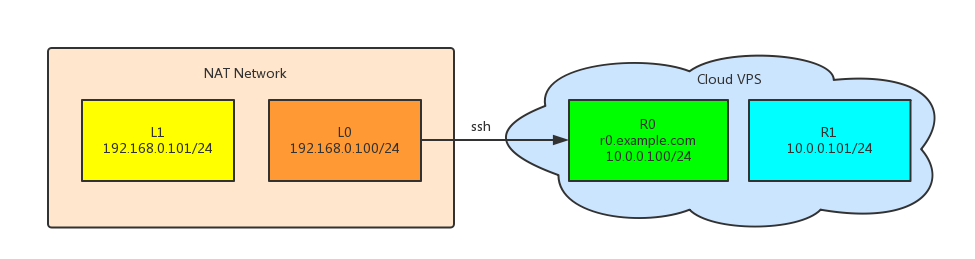
L0: localhost behind NAT, with lan ip 192.168.0.100
L1: host within same lan of L0, with lan ip 192.168.0.101
R0: remote host (cloud vps) with private ip 10.0.0.100
R1: remote host (cloud vps) with private ip 10.0.0.101
L0 can ssh (default port 22) to R0 by its public domain name r0.example.com with public key, like this:
1
ssh user@r0.example.com
Forwarding local host (-L)
Usage
Specifies that the given port on the local (client) host is to be forwarded to the given host and port on the remote side.
SSH -L is good for exposing a remote port locally.
增强本地主机的访问远程主机(局域网)能力。
Example
1. Forward L0 to R0
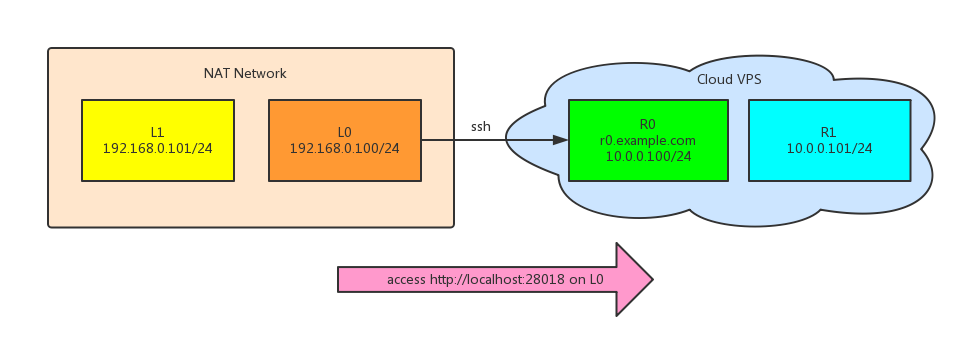
The mongod has the http web service, listening only on localhost:28017. With the following command:
1
ssh -NL 28018:localhost:28017 user@r0.example.com
Then the remote service on 28017 will be accessed on L0’s 28018 port from L0.
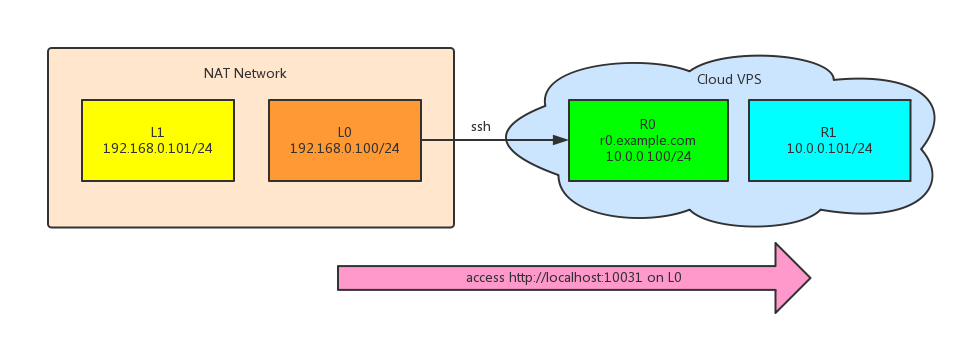
2. Forward L0 to R1
Suggest that there’s an API server on R1, listening only on port 10030 of lan (10.0.0.0/24).
Because R0 can access R1’s private address of the same lan, so the following command will make R1’s service of port 10030 accessible from L0’s local port 10031.
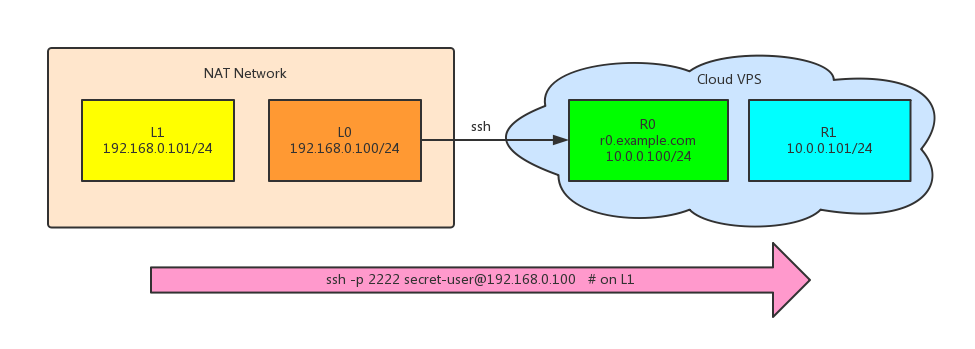
will forward L0’s port 2222 to the R1’s port 22, and even make L0 listening within the lan. So from L1, we can access to R1 by this command:
1
ssh -p 2222 secret-user@192.168.0.100
Awesome!
Forwarding remote host (-R)
Usage
Specifies that the given port on the remote (server) host is to be forwarded to the given host and port on the local side.
So the SSH -R can be useful when accessing a box hidden behind a NAT.
增强远端主机的访问本地主机(局域网)的能力。
Example
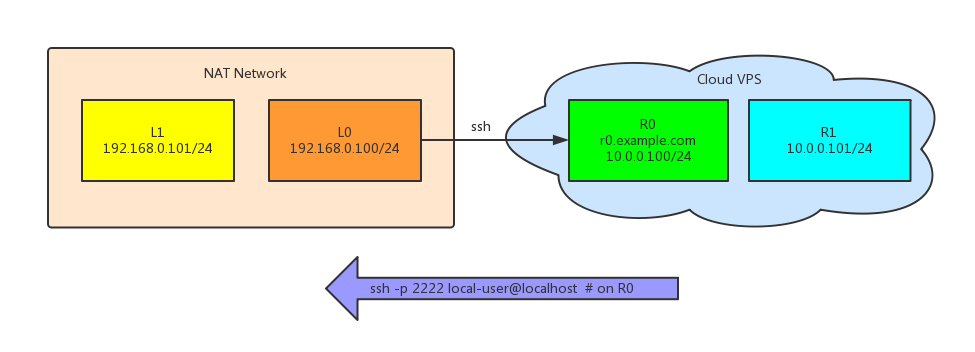
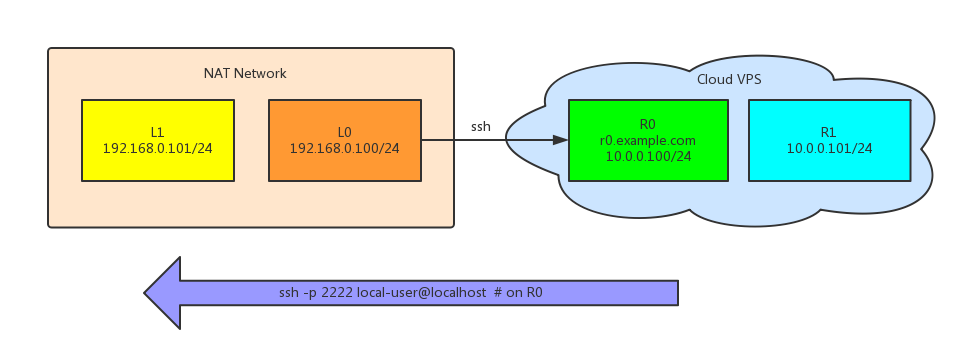
1. Forward R0 to L0
1
ssh -NR 2222:localhost:22 user@r0.example.com
2. Forward R0 to L1
1
ssh -NR 2222:192.168.0.101:22 user@r0.example.com
3. Forward R1 to L1
Unlike local forwarding, remote forwarding from R1 to L1 is not permitted by default due to security policy,
unless we change sshd_config file on R0, with the additional config line:
1
GatewayPorts = yes
then the ultimate tunnel created, with which we can access L1’s port on machine R1. Cool?
Dynamic forwarding (-D)
Usage
Specifies a local “dynamic” application-level port forwarding...and ssh will act as a SOCKS server.
Example
1
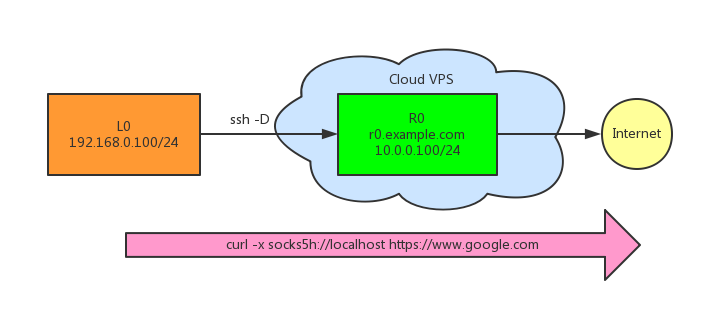
ssh -ND 1080 user@r0.example.com
Then, there exists a SOCKS server on L0, and we can use it as a proxy server.
Socket Secure (SOCKS) is an Internet protocol that routes network packets between a client and server through a proxy server. SOCKS5 additionally provides authentication so only authorized users may access a server.
Practically, a SOCKS server proxies TCP connections to an arbitrary IP address, and provides a means for UDP packets to be forwarded.SOCKS operates at a lower level than HTTP proxying: SOCKS uses a handshake protocol to inform the proxy software about the connection that the client is trying to make, and then acts as transparently as possible. SOCKS proxies can also forward UDP traffic and work in reverse.
shadowsocks
Shadowsocks is a fast tunnel proxy that can help bypass firewalls.
test environment
Remote VPS OS: Ubuntu-14.04 Server VPS on DigitalOcean
Note that we specify protocal as socks5h instead of socks5, which means we use the specified SOCKS5 proxy, and let the proxy resolve the host name, otherwise it may not resolve hostname. And port 1080 is by default.
var http = require('http');
var socketio = require('socket.io');
var session = require('express-session');           // 会话支持
var passport = require('passport');                 // 身份认证,依赖express-session
var RedisStore = require('connect-redis')(session); // redis存储,用于持久化会话
var RedisAdapter = require('socket.io-redis');      // 存储web-socket的连接
var mongoose = require('mongoose');
// ...
var app = express();
var server = http.Server(app);
var sio = socketio(server);
 Awesome!