In a typical business flow implementation, we usually store the function pointers in some collection data structures (list, hashmap..), and dynamically invoke them according to the inputs/events/conditions, with multiple thread.
But how to with those async function? In dynamic language like JavaScript/Python, this is fairly simple and straightforward. However, this is not the case in the Rust world.
As we’ve tried, storing async functions in a Vec can be challenging because Rust’s async functions (and closures) typically return different types that all implement the Future trait. However, these types are not the same, even if they have the same signature. In Rust, we have to pin and box the Future returned as well as the whole function.
Define the Boxed Future
What we need to do first iss defining a type alias for a boxed future:
Pin<Box<...>>: The Pin type ensures that the Future inside the Box cannot be moved in memory, which is important for certain async operations.
dyn Future<Output = T> + Send + 'a:
dyn Future<Output = T>: A dynamically dispatched future returning a value of type T.
Send: Ensures the future can be sent across thread boundaries.
'a: Ensures that all references within the future are valid for at least as long as the lifetime ‘a.
Pin and Box the async function with wrapper
Then we need to wrap our async functions, making them return the boxed future.
Say our async functions are all of the same signature:
To make our async function can be called/refered, we add Send and Sync trait bounds to our boxed function.Notice that the result Future it returns need not to be Sync, for we don’t need to refer it in different threads usually, we just consume it on the fly. As a recap, Send means we can safely transfer ownership among threads, and Sync means that we can safely transfer reference among threads.
usestd::future::Future;usestd::pin::Pin;usestd::collections::VecDeque;usestd::error::Error;usestd::boxed::Box;// Define a type alias for a boxed future with a specific lifetimetypeBoxFuture<'a,T>=Pin<Box<dynFuture<Output=T>+Send+'a>>;// Define a type alias for a boxed async function that takes an i32 parametertypeBoxAsyncFn=Box<dynFn(i32)->BoxFuture<'static,Result<i32,Box<dynError+Send>>>+Send+Sync>;// Example async function that takes an i32 parameter and returns a Resultasyncfnasync_fn1(v:i32)->Result<i32,Box<dynError+Send>>{Ok(v+1)}// Another example async function that takes an i32 parameter and returns a Resultasyncfnasync_fn2(v:i32)->Result<i32,Box<dynError+Send>>{Ok(v*2)}// Function to box the async functions that take an i32 parameterfnbox_async_fn<F,Fut>(f:F)->BoxAsyncFnwhereF:Fn(i32)->Fut+Send+Sync+'static,Fut:Future<Output=Result<i32,Box<dynError+Send>>>+Send+'static,{Box::new(move|v|Box::pin(f(v)))}fnmain(){// Create a vector to store boxed async functionsletmutasync_fns:VecDeque<BoxAsyncFn>=VecDeque::new();// Add async functions to the vector without parametersasync_fns.push_back(box_async_fn(async_fn1));async_fns.push_back(box_async_fn(async_fn2));// Parameters to pass to the async functionsletparams=vec![10,20];// Execute the async functions with parametersfor(fut,¶m)inasync_fns.iter().zip(params.iter()){matchfutures::executor::block_on(fut(param)){Ok(result)=>println!("Success: {}",result),Err(e)=>eprintln!("Error: {}",e),}}}
Some explanations here:
- BoxFuture Type Alias simplifies the type signature for boxed futures.
- Async Functions, like async_fn1, are our example async functions, containing the business logic.
- The wrapper function box_async_fn, it box the async functions into the BoxFuture type.
- With the Storing Vec, or you can use any collection type, like Vector or Hashmap, we store our boxed function (namely function pointer), in it.
And of course, you can then use an async runtime like Tokio (or async-std) to run our functions for better performance, but this basic example juse demonstrates the concept.
Fear no fraid and happy Pinning(Boxing) your async functions with Rust!
However, for Ubuntu 18.04 or 20.04, Shadowsocks server command ssserver would lead to the following error:
12345678910111213141516171819202122232425
2020-09-23 11:33:21 INFO     loading libcrypto from libcrypto.so.1.1
Traceback (most recent call last):
  File "/usr/local/bin/ssserver", line 8, in <module>
    sys.exit(main())
  File "/usr/local/lib/python3.8/dist-packages/shadowsocks/server.py", line 34, in main
    config = shell.get_config(False)
  File "/usr/local/lib/python3.8/dist-packages/shadowsocks/shell.py", line 262, in get_config
    check_config(config, is_local)
  File "/usr/local/lib/python3.8/dist-packages/shadowsocks/shell.py", line 124, in check_config
    encrypt.try_cipher(config['password'], config['method'])
  File "/usr/local/lib/python3.8/dist-packages/shadowsocks/encrypt.py", line 44, in try_cipher
    Encryptor(key, method)
  File "/usr/local/lib/python3.8/dist-packages/shadowsocks/encrypt.py", line 82, in __init__
    self.cipher = self.get_cipher(key, method, 1,
  File "/usr/local/lib/python3.8/dist-packages/shadowsocks/encrypt.py", line 109, in get_cipher
    return m[2](method, key, iv, op)
  File "/usr/local/lib/python3.8/dist-packages/shadowsocks/crypto/openssl.py", line 76, in __init__
    load_openssl()
  File "/usr/local/lib/python3.8/dist-packages/shadowsocks/crypto/openssl.py", line 52, in load_openssl
    libcrypto.EVP_CIPHER_CTX_cleanup.argtypes = (c_void_p,)
  File "/usr/lib/python3.8/ctypes/__init__.py", line 386, in __getattr__
    func = self.__getitem__(name)
  File "/usr/lib/python3.8/ctypes/__init__.py", line 391, in __getitem__
    func = self._FuncPtr((name_or_ordinal, self))
AttributeError: /lib/x86_64-linux-gnu/libcrypto.so.1.1: undefined symbol: EVP_CIPHER_CTX_cleanup
It seems that there’s no symbol EVP_CIPHER_CTX_cleanup within libcrypto.so, which shadowsocks needs.
check the symbols in libcrypto.so.1.1:
12345678910111213141516171819202122232425262728
brooke@VM-101-145-ubuntu:~$ nm -gD /usr/lib/x86_64-linux-gnu/libcrypto.so.1.1 | grep EVP_CIPHER_CTX
000000000016dab0 T EVP_CIPHER_CTX_block_size
000000000016deb0 T EVP_CIPHER_CTX_buf_noconst
000000000016dae0 T EVP_CIPHER_CTX_cipher
000000000016e510 T EVP_CIPHER_CTX_clear_flags
000000000016d350 T EVP_CIPHER_CTX_copy
000000000016cd10 T EVP_CIPHER_CTX_ctrl
000000000016daf0 T EVP_CIPHER_CTX_encrypting
000000000016c160 T EVP_CIPHER_CTX_free
000000000016db10 T EVP_CIPHER_CTX_get_app_data
000000000016db30 T EVP_CIPHER_CTX_get_cipher_data
000000000016de90 T EVP_CIPHER_CTX_iv
000000000016db60 T EVP_CIPHER_CTX_iv_length
000000000016dea0 T EVP_CIPHER_CTX_iv_noconst
000000000016def0 T EVP_CIPHER_CTX_key_length
000000000016c140 T EVP_CIPHER_CTX_new
000000000016e060 T EVP_CIPHER_CTX_nid
000000000016dec0 T EVP_CIPHER_CTX_num
000000000016de80 T EVP_CIPHER_CTX_original_iv
000000000016d310 T EVP_CIPHER_CTX_rand_key
000000000016c090 T EVP_CIPHER_CTX_reset
000000000016db20 T EVP_CIPHER_CTX_set_app_data
000000000016db40 T EVP_CIPHER_CTX_set_cipher_data
000000000016e500 T EVP_CIPHER_CTX_set_flags
000000000016d2a0 T EVP_CIPHER_CTX_set_key_length
000000000016ded0 T EVP_CIPHER_CTX_set_num
000000000016cce0 T EVP_CIPHER_CTX_set_padding
000000000016e520 T EVP_CIPHER_CTX_test_flags
No cleanup, but reset. And it was changed in OpenSSL 1.1.0, introduced here.
EVP_CIPHER_CTX was made opaque in OpenSSL 1.1.0. As a result, EVP_CIPHER_CTX_reset() appeared and EVP_CIPHER_CTX_cleanup() disappeared. EVP_CIPHER_CTX_init() remains as an alias for EVP_CIPHER_CTX_reset().
Solution
Solved by replacing all (total 2) the EVP_CIPHER_CTX_cleanup() functions to EVP_CIPHER_CTX_reset() in the openssl.py file. With the following command:
Seccomp (short for Secure Computing mode) is a computer security facility in the Linux kernel. It was merged into the Linux kernel mainline in kernel version 2.6.12, which was released on March 8, 2005. Seccomp allows a process to make a one-way transition into a “secure” state in which it cannot make some system calls. If it attempts, the kernel will terminate the process tith SIGSYS.
Seccomp-BPF was released in 2012, providing more syscall filtering features on bpf.
It is used in many sandbox-like applications (i.e. Chrome/Chromium, Firefox, Docker, QEMU, Android, Systemd, OpenSSH…) for resource isolation purposes.
Basic example
Question: How to block specified syscalls?
First off, we need header files to use libseccomp2. Get the package installed:
1
apt install libseccomp-dev
The following code (function filter_syscalls()) shows how we use seccomp in common. It filters the fchmodat and symlinkat syscalls. And also blocks write syscall, if the write count argument exceeds 2048.
Note: compile the above with -lseccomp flags, and run it when we get our secured shell.
Then, try it with the execed bash prompt:
1234567891011121314151617181920
brooke@VM-250-12-ubuntu:~/seccomp_demo$ gcc seccomp_basic.c -l seccomp && ./a.out
[DEBUG]seccomp_basic.c: 32: filtering syscalls...
brooke@VM-250-12-ubuntu:~/seccomp_demo$ chmod -x a.out    # test fchmodat
Bad system call (core dumped)
brooke@VM-250-12-ubuntu:~/seccomp_demo$ ln -s a.out       # test symlinkat
Bad system call (core dumped)
brooke@VM-250-12-ubuntu:~/seccomp_demo$ echo "hello"      # test write
hello
brooke@VM-250-12-ubuntu:~/seccomp_demo$ cat seccomp_basic.c   # test write
Bad system call (core dumped)

brooke@VM-250-12-ubuntu:~/seccomp_demo$ cat /proc/$$/status
...
NoNewPrivs:     1     # cannot be applied to child processes with greater privileges
Seccomp:        2     # Seccomp filter mode
...

brooke@VM-250-12-ubuntu:~/seccomp_demo$ sudo ls
sudo: effective uid is not 0, is /usr/bin/sudo on a file system with the 'nosuid' option set or an NFS file system without root privileges?
brooke@VM-250-12-ubuntu:~/seccomp_demo$ exit  # Don't forget quit bash
As expected, the process (subprocess) invoke filtered syscall get SIGSYS, and core-dumped.
Export filter’s bpf
Underneath, seccomp performs filtering by using bpf, which we’ll explain later. The libseccomp provide useful funcitons to generate and output the corresponding bpf as well as pfc (Pseudo Filter Code). Thus we can take a more close look.
For a trival case, we only filter the fchmodat syscall, and export bpf:
It seems quite straightforward. And there’s an awesome tool: seccomp-tools which can disassembles seccomp_filter.bpf above:
123456789
 line  CODE  JT   JF      K
 0000: 0x20 0x00 0x00 0x00000004  A = arch
 0001: 0x15 0x00 0x05 0xc000003e  if (A != ARCH_X86_64) goto 0007
 0002: 0x20 0x00 0x00 0x00000000  A = sys_number
 0003: 0x35 0x00 0x01 0x40000000  if (A < 0x40000000) goto 0005
 0004: 0x15 0x00 0x02 0xffffffff  if (A != 0xffffffff) goto 0007
 0005: 0x15 0x01 0x00 0x0000010c  if (A == fchmodat) goto 0007
 0006: 0x06 0x00 0x00 0x7fff0000  return ALLOW
 0007: 0x06 0x00 0x00 0x00000000  return KILL
Seccomp-BPF
Seccomp-BPF is just an extension of cBPF (classical Berkeley Packet Filter, Note: not eBPF).
The tiny bpf program runs on a specific VM in kernel, with a rather limited registers and a more reduced instruction set.
BPF code definitions in /usr/include/linux/filter.h:
We can of course, directly apply seccomp-bpf binary code with prctl(), which wraps the seccomp syscall,
to gain more fine-graind control of our bpf. But in most casses, those libseccomp wrappers, like seccomp_rule_add() just works.
The binary code is the same as the just hexdumped file for filtering fchmodat.
int filter_syscalls() {
    int ret = -1;

    log_debug("filtering syscalls with bpf...");

    struct sock_filter code[] = {
        /* op,   jt,   jf,     k    */
        {0x20, 0x00, 0x00, 0x00000004},
        {0x15, 0x00, 0x05, 0xc000003e},
        {0x20, 0x00, 0x00, 0x00000000},
        {0x35, 0x00, 0x01, 0x40000000},
        {0x15, 0x00, 0x02, 0xffffffff},
        {0x15, 0x01, 0x00, 0x0000010c}, // 268 fchmodat
        {0x06, 0x00, 0x00, 0x7fff0000},
        {0x06, 0x00, 0x00, 0x00000000},
    };

    struct sock_fprog bpf = {
        .len = ARRAY_SIZE(code),
        .filter = code,
    };

    ret = prctl(PR_SET_NO_NEW_PRIVS, 1, 0, 0, 0);
    if (ret < 0) { log_error("error prctl set no new privs"); return EXIT_FAILURE; }

    prctl(PR_SET_SECCOMP, SECCOMP_MODE_FILTER, &bpf);
    if (ret < 0) { log_error("error prctl set seccomp filter"); return EXIT_FAILURE; }

    return 0;
}
Performance Overhead
There is no such thing as a free lunch, so as the seccomp-bpf. After all,it is a hooking program, that runs each time whever and whatever a syscall invoked.
We benchmarked 3 senarios: no filter, filter that blocks 1 syscall, and filter that blocks 100 syscall (a more sophisticated bpf).
And we measured the time elpased during 10million write() syscall, and plotted as following:
hc_test
As it shows, the overhead is around 5%~10%, and will be even more with the larger bpf code.
Summary
In this post, we managed to filter syscalls with several seccomp-related facilities, inspect the seccomp-bpf code, and understand its costs.
This would be helpful especially if you’re implementing your sandbox-like applications that need security concerns.
Wish you enjoy hacking!
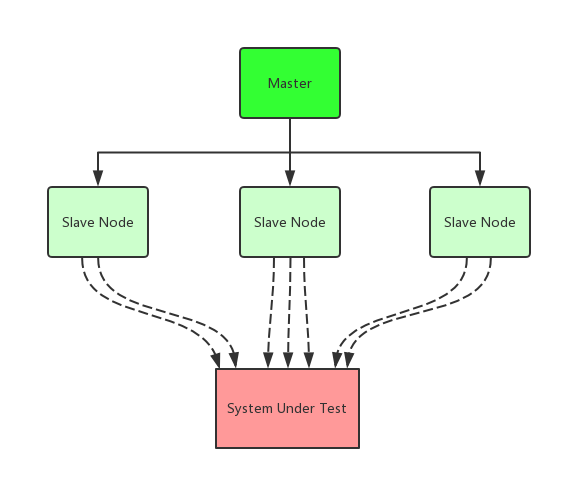
In my previous post http load testing with wrk2, we’ve introduced some of the concepts of HTTP benchmarking. However that is not the only case, especially when the client is not as performant as the target server. More often, system developers use multiple clients (load testing clusters) to generate more loads. As shown with the picture:
Why locust?
There’s lots of open-source aimed at distributed load testing, like:
In fact, locust supports user scenarios by this kind of python script, which is very customizable.
Start master
1
locust--host=http://TEST_TARGET_HOST:PORT--master
Start slave
1
locust--slave--master-host=MASTER_HOST
Finally, go to master web-ui (default port on 8089), and start spawning locust!
Before launching, we should specify our expected number of users, and the hatch rate.
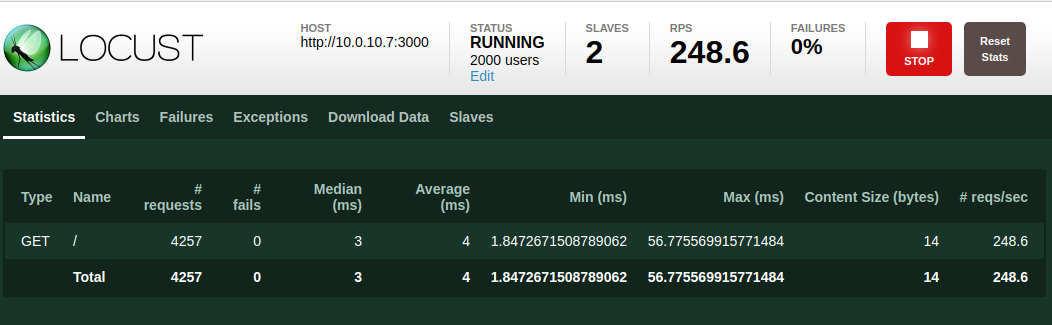
When testing, locust web-ui provides real-time statistics for us, including RPS, Response Time.
Trouble shooting
You’ll get too open files issue if you forget to set it with ulimit command.
problems with locust
Python is not a fast language, the problem is even exacerbated when it comes to the IO-intensive application. Fortunately, locust is designed and implemented to be well scaled out, and the problem can be ameliorated a lot.
AutoScaling cluster on cloud
For deploying locust testing on cloud, the most suitable product is cluster management service, no matter whether it’s the cluster for virtual machine (AutoScaling), or the cluster for container (Kubernetes Service). In this post, we conduct our load testing with AutoScaling of TencentCloud.
First, we build our locust image in which the locust package is installed and locust file is prepared. Second, we create our testing cluster, namely an AutoScalingGroup of our test LaunchConfiguration, which is an instance template associated with the locust image we just build. Additionally, we need to make sure that our testing cluster and target host are in the same VirtualPrivateCloud, so that they can access each other within the private network and cost little for network bandwidth. And setup the External IP as well as the Security groups for locust master node, as we’ll access its port 8089 for the web-ui.
Now that we’ve set up our load testing cluster, we could tune its Expected Instance Number on our demand.
When to add client?
Usually, as long as the final RPS increases proportionally with the number of clients, we should consider add 1 more client. In our example, 6 clients proved to be just enough.
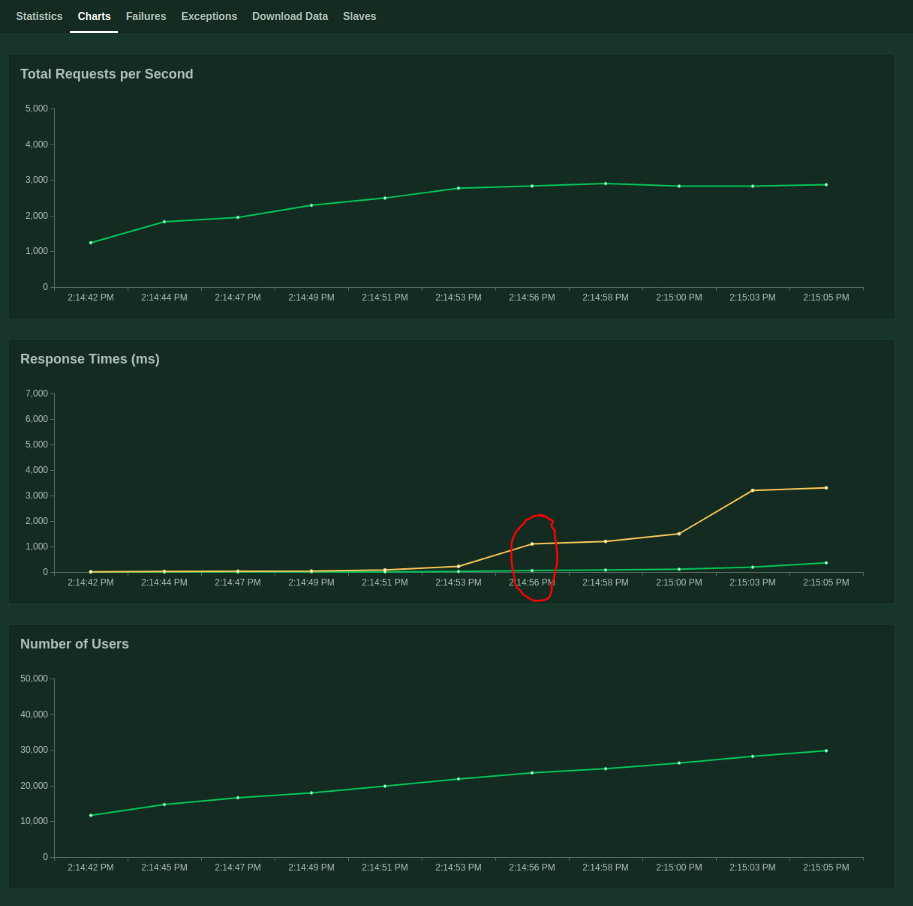
How to inspect the chart to find the best performance?
When the QoS is no longer satisfied, there comes the point. As the above chart shows, the p95 is longer than 1s when the number of concurrent user reaches to 22K, and the RPS is 2830 by that time. That’s it.
Conclusions
By this post, we’ve completed an example of distributed load testing. Although there’s a plenty of choice of testing tools, the locust is such an easy-to-use tool to help us understand the basic concepts. Thanks to the cloud-managed service like AutoScaling, we can manage our workload cluster with ease. And happy benchmarking!
An “eventfd object” can be used as an event wait/notify mechanism by user-space applications, and by the kernel to notify user-space applications of events.
It has been added to kernel since Linux 2.6.22. And the object contains an unsigned 64-bit integer (uint64_t) counter that is maintained by the kernel. So it’s extremely fast to access.
That’s all we need to create one eventfd file, after that, we can perform normal file operations (like read/write, poll and close) with it.
Once some user-space thread write it with value greater than 0, it will instantly be notified to user-space by kernel. Then, the first thread which read it, will reset it (zero its counter), i.e. consume the event. And all the later read will get Error (Resource Temporarily Unavailable), until it is written again (event triggered). Briefly, it transforms an event to a file descriptor that can be effectively monitored.
There’re several notes of which we should take special account:
Applications can use an eventfd file descriptor instead of a pipe in all cases where a pipe is used simply to signal events. The kernel overhead of an eventfd file descriptor is much lower than that of a pipe, and only one file descriptor is required (versus the two required for a pipe).
As with signal events, eventfd is much more light-weight (thus fast) compared to the pipes, it’s just a counter in kernel after all.
A key point about an eventfd file descriptor is that it can be monitored just like any other file descriptor using select(2), poll(2), or epoll(7). This means that an application can simultaneously monitor the readiness of “traditional” files and the readiness of other kernel mechanisms that support the eventfd interface.
You won’t wield the true power of eventfd, unless you monitor them with epoll (especially EPOLLET).
So, let’s get our hands dirty with an simple worker thread pool!
Worker Pool Design
We adopt Producer/Consumer pattern for our worker thread pool, as it’s the most common style of decoupling, achieving the best scalability.
By leveraging the asynchronous notification feature from the eventfd, our inter-thread communication sequence could be described as following:
Implementation
Our per-thread data structure is fairly simple, only contains 3 fields: thread_id, rank (thread index) and epfd which is the epoll file descriptor created by main function.
staticvoid*consumer_routine(void*data){structthread_info*c=(structthread_info*)data;structepoll_event*events;intepfd=c->epfd;intnfds=-1;inti=-1;intret=-1;uint64_tv;intnum_done=0;events=calloc(MAX_EVENTS_SIZE,sizeof(structepoll_event));if(events==NULL)exit_error("calloc epoll events\n");for(;;){nfds=epoll_wait(epfd,events,MAX_EVENTS_SIZE,1000);for(i=0;i<nfds;i++){if(events[i].events&EPOLLIN){log_debug("[consumer-%d] got event from fd-%d",c->rank,events[i].data.fd);ret=read(events[i].data.fd,&v,sizeof(v));if(ret<0){log_error("[consumer-%d] failed to read eventfd",c->rank);continue;}close(events[i].data.fd);do_task();log_debug("[consumer-%d] tasks done: %d",c->rank,++num_done);}}}}
As we can see, the worker thread get the notification by simply polling epoll_wait() the epoll-added fd list, and read() the eventfd to consume it, then close() to clean it.
And we can do anything sequential within the do_task, although it now does nothing.
In short: poll -> read -> close.
Producer thread routine
123456789101112131415161718192021
staticvoid*producer_routine(void*data){structthread_info*p=(structthread_info*)data;structepoll_eventevent;intepfd=p->epfd;intefd=-1;intret=-1;intinterval=1;log_debug("[producer-%d] issues 1 task per %d second",p->rank,interval);while(1){efd=eventfd(0,EFD_CLOEXEC|EFD_NONBLOCK);if(efd==-1)exit_error("eventfd create: %s",strerror(errno));event.data.fd=efd;event.events=EPOLLIN|EPOLLET;ret=epoll_ctl(epfd,EPOLL_CTL_ADD,efd,&event);if(ret!=0)exit_error("epoll_ctl");ret=write(efd,&(uint64_t){1},sizeof(uint64_t));if(ret!=8)log_error("[producer-%d] failed to write eventfd",p->rank);sleep(interval);}}
In producer routine, after creating eventfd, we register the event with epoll object by epoll_ctl(). Note that the event is set for write (EPOLLIN) and Edge-Triggered (EPOLLET).
For notification, what we need to do is just write 0x1 (any value you want) to eventfd.
You can adjust threads number to inspect the detail, and there’s a plethora of fun with it.
But now, let’s try something hard. We’ll smoke test our worker by generate a heavy instant load, instead of the former regular one. And we tweak the producer/consumer thread to 1, and watching the performance.
123456789101112131415161718192021
staticvoid*producer_routine_spike(void*data){structthread_info*p=(structthread_info*)data;structepoll_eventevent;intepfd=p->epfd;intefd=-1;intret=-1;intnum_task=1000000;log_debug("[producer-%d] will issue %d tasks",p->rank,num_task);for(inti=0;i<num_task;i++){efd=eventfd(0,EFD_CLOEXEC|EFD_NONBLOCK);if(efd==-1)exit_error("eventfd create: %s",strerror(errno));event.data.fd=efd;event.events=EPOLLIN|EPOLLET;ret=epoll_ctl(epfd,EPOLL_CTL_ADD,efd,&event);if(ret!=0)exit_error("epoll_ctl");ret=write(efd,&(uint64_t){1},sizeof(uint64_t));if(ret!=8)log_error("[producer-%d] failed to write eventfd",p->rank);}return(void*)0;}
Over 1 million? Indeed! By using the ulimit command below, we can increase the open files limit of the current shell, which is usually 1024 by default.
Note that you need to be root.
12345
ulimit-n1048576# 1048576 is the default maximum for open files, as `/proc/sys/fs/nr_open` shows.# To make it larger, you need to tweak kernel settings like this (which is beyond our scope)# sysctl -w fs.nr_open=10485760
Since the info of stdout is so much that we redirect the stdout to file log.
With my test VM (S2.Medium4 type on TencentCloud, which has only 2 vCPU and 4G memory, it takes less than 6.5 seconds to deal with 1 million concurrent (almost) events. And we’ve seen the kernel-implemented counters and wait queue are quite efficient.
Conclusions
Multi-threaded programming model is prevailing now, while the best way of scheduling (event trigger and dispatching method) is still under discussion and sometimes even opinionated.
In this post, we’ve implemented general-purposed worker thread pool based on an advanced message mechanism, which includes:
message notification: asynchronous delivering, extremely low overhead, high performance
message dispatching: as a load balancer, highly scalable
message buffering: as message queue, with robustness
All the above are fulfilled by using basic Linux kernel feature/syscall, like epoll and eventfd.
Everyone may refers to this approach when he/she designs a single-process performant (especially IO-bound) background service.
To sum up, taking advantage of Linux kernel capability, we are now managed to implement our high-performance message-based worker pool, which is able to deal with large throughput and of high scalability.
How to measure our server’s performance?
With this article, we’ll discuss and experiment with HTTP server benchmark.
Let’s start to recap some of the key concept related:
Connection
The number of simultaneous tcp connections, sometimes refered as Number of Users in other benchmark tools.
Latency
For HTTP request, it is the same as the Response Time, measured by ms. And it is tested from clients.
The latency percentile, like p50/p90/p99, is the most common QoS metric.
Throughput
For HTTP request, it’s also refered as requests/second or RPS for short. Usually, as the number of connections increases, the system throughput goes down.
So, what does load testing really mean?
In brief, it’s to determine the maximum throughput (the highest RPS), under specified number of connection, with all response time satisfying the latency target.
Thus, we can remark a server capability like this:
“Our server instance can achieve 20K RPS under 5K simultaneous connections with latency p99 at less than 200ms.”
What’s wrk2
wrk2 is an HTTP benchmarking cli tool, which is considered better than ab or wrk.
With wrk2, we are able to generate some constant throughput load, and its latency detail is more accurate. As a command-line tool, it’s quite convenient and fast.
-d: duration, test time. Note that it has a 10 second calibration time, so this should be specified no shorter than 20s.
-t: threads num. Just set it to cpu cores.
-R: or –rate, expected throughput, the result RPS which is real throughput, will be lower than this value.
-c: connections num. The Number of connections that will be kept open.
SUT simple implementation
All servers are simple http-server, which simply response Hello, world!\n to clients.
Rust 1.28.0 (hyper 0.12)
Go 1.11.1 http module
Node.js 8.11.4
Python 3.5.2 asyncio
Testing Workflow
Our latency target: The 99 percentile is less than 200ms. It’s a fairly high performance in real world.
Due to the calibration time of wrk2, all the test last for 30~60 seconds.
And since our test machine has 2 cpu-threads, our command is like:
We iterate to execute the command, and increase the request rate (-R argument) by 500 on each turn until we find the maximum RPS. The whole workflow can be explained as:
Then we go on test for a larger number of connections, until the latency target is no longer satisfied or socket connection errors occur. And move to next server.
Results Analysis
Now, let’s feed our output data to plot program with matplotlib, and finally get the whole picture below:
The plot is fairly clear. Rust beats Go even in such an I/O intensive scenario, which shows the non-blocking sockets version of hyper really makes something great. Node.js is indeed slower than Go, while Python’s default asyncio event loop have a rather poor performance.
As a spoiler alert, for the even more connections (i.e. 5K, 10K…), both Rust and Go can still hold very well without any socket connection error, though the response time is longer, and Rust still performed better, while the last two may get down.
Conclusions
In this post, we managed to benchmark the performance of our web server by using wrk2. And with finite experiment steps, we could determine the server’s highest throughput under certain number of connections, which meets the specified latency QoS target.
A loadable kernel module (LKM) is a mechanism for adding/removing code from Linux kernel at run time.
Many of device drivers are implemented through this way, otherwise the monolithic kernel would be too large.
LKM communicates with user-space applications through system calls, and it can access almost all the objects/services of the kernel.
LKM can be inserted to the monolithic kernel at any time – usually at booting or running phase.
Writing LKM has many advantages against directly tweaking the whole kernel. For LKM can be dynamically inserted or removed at run time, we don’t need to recompile the whole kernel nor reboot, and it’s more shippable.
So, the easiest way to start kernel programming is to write a module - a piece of code that can be dynamically loaded into the kernel.
How is the LKM different from an user-space application?
LKM is run in kernel space, which is quite different.
First off, the code is always asynchronous, which means it doesn’t execute sequentially and may be interrupted at any time. Thus programmers should always care about the concurrency as well as reentrant issues. Unlike user-space application, which has an entry-point like main() and then execute and exit, the LKM is more like a complicated event-driven server that internally has the ability to interact with various kernel services, and externally provides system calls as its user-space api.
Secondly, there’s only a fixed and small stack, resource cleanup as well as utilization should always be highly considered. While as for the user-space application, the resource quota is fairly sufficient.
Thirdly, note that there’s no floating-point math.
#include <linux/module.h>MODULE_LICENSE("GPL");MODULE_AUTHOR("Brooke Yang");MODULE_DESCRIPTION("A simple Linux moadable mernel module");MODULE_VERSION("0.1");staticchar*name="world";module_param(name,charp,S_IRUGO);MODULE_PARM_DESC(name,"The name to display");staticint__inithello_init(void){pr_info("HELLO: Hello, %s!\n",name);return0;}staticvoid__exithello_exit(void){pr_info("HELLO: Bye-bye, %s!\n",name);}module_init(hello_init);module_exit(hello_exit);
pr_info is a more convenient way of debugging, comparing to the old-style printk.
1
printk(KERN_INFO ...);
Makefile
123456
obj-m+=hello.o

all:
  make -C /lib/modules/$(shell uname -r)/build/ M=$(PWD) modules
clean:
  make -C /lib/modules/$(shell uname -r)/build/ M=$(PWD) clean
Build && Install
Now we can make our hello module and then a hello.ko emerged successfully.
12345678910111213141516171819
root@kali:/opt/kernel-modules/hello# make
make -C /lib/modules/4.18.0-kali2-amd64/build/ M=/opt/kernel-modules/hello modules
make[1]: Entering directory '/usr/src/linux-headers-4.18.0-kali2-amd64' CC [M] /opt/kernel-modules/hello/hello.o
Building modules, stage 2.
MODPOST 1 modules
CC /opt/kernel-modules/hello/hello.mod.o
LD [M] /opt/kernel-modules/hello/hello.ko
make[1]: Leaving directory '/usr/src/linux-headers-4.18.0-kali2-amd64'root@kali:/opt/kernel-modules/hello# ls -l
total 556
-rw-r--r-- 1 root root 566 Oct 23 09:41 hello.c
-rw-r--r-- 1 root root 272720 Oct 23 09:41 hello.ko
-rw-r--r-- 1 root root 872 Oct 23 09:41 hello.mod.c
-rw-r--r-- 1 root root 136376 Oct 23 09:41 hello.mod.o
-rw-r--r-- 1 root root 137864 Oct 23 09:41 hello.o
-rw-r--r-- 1 root root 154 Oct 23 09:38 Makefile
-rw-r--r-- 1 root root 42 Oct 23 09:41 modules.order
-rw-r--r-- 1 root root 0 Oct 23 09:41 Module.symvers
Display module info
123456789101112
root@kali:/opt/kernel-modules/hello# modinfo hello.ko
filename:       /opt/kernel-modules/hello/hello.ko
version:        0.1
description:    A simple Linux moadable mernel module
author:         Brooke Yang
license:        GPL
srcversion:     440743A20C6C4688E185D30
depends:
retpoline:      Y
name:           hello
vermagic:       4.18.0-kali2-amd64 SMP mod_unload modversions
parm:           name:The name to display (charp)
we can watch the log by tail -f the /var/log/kern.log or just dmesg
1234
Oct 23 09:51:37 kali kernel: [ 2651.831228] HELLO: Hello, world!
Oct 23 09:51:44 kali kernel: [ 2658.680087] HELLO: Bye-bye, world!
Oct 23 09:51:57 kali kernel: [ 2672.409216] HELLO: Hello, Brooke!
Oct 23 09:52:02 kali kernel: [ 2677.482181] HELLO: Bye-bye, Brooke!
Done!
note: char parm can even be Chinese.
Conclusions
With this article, we managed to complete our first yet very simple Linux loadable kernel module(LKM).
We’ve got a broad view of how the LKMs work. And we should configure our own kernel modules, build and insert/remove them at runtime, and define/pass custom parameters to them.
For my system, the kernel version is 4.18, which will be used in following example. Of course, the workflow of other version is just the same.
1234
apt install linux-source-4.18
[...]
ls /usr/src
linux-config-4.18 linux-patch-4.18-rt.patch.xz linux-source-4.18.tar.xz
Then we get the compressed archive of the kernel sources, and we’ll extract these files in our working directory, (no special permission need for compiling the kernel). In our example, we use /opt/kernel, and the ~/kernel is also an appropriate place.
12
mkdir /opt/kernel; cd /opt/kernel
tar -xaf /usr/src/linux-source-4.18.tar.xz
Optionally, we may also apply the rt patch, which is for real-time os features.
12
cd /opt/kernel/linux-source-4.18
xzcat /usr/src/linux-patch-4.18-rt.patch.xz | patch -p1
Configure the Kernel
When building a more recent version of kernel (possibly with an specific patch), the configuration should at first be kept as close as possible to the current running kernel, shown by uname -r. It is sufficient to just copy the currently-used kernel config to the source directory.
12
cd /opt/kernel/linux-source-4.18
cp /boot/config-4.18.0-kali2-amd64 .config
If you need to make some changes or decide to reconfigure all things from scratch, just call make menuconfig command and inspect all the details.
Note: we can tweak a lot in this phase.
Write Some Code
Add one line of code for test(fun), in file init/main.c, start_kernel function
Once configured, we can make the kernel. Rather than invoking make deb-pkg as the official doc suggested, we use make bindeb-pkg here, which will not generate Debian source package, or invoke make clean.
1
time make -j4 bindeb-pkg LOCALVERSION=-custom KDEB_PKGVERSION=$(make kernelversion)-$(date +%Y%m%d)
After a while, we get following package in the parent directory
1234
linux-headers-4.18.10-custom_4.18.10-20181021_amd64.deb   # headers
linux-image-4.18.10-custom_4.18.10-20181021_amd64.deb     # kernel image
linux-image-4.18.10-custom-dbg_4.18.10-20181021_amd64.deb # kernel image with debugging symbols
linux-libc-dev_4.18.10-20181021_amd64.deb                 # headers of user-space library
Trouble Shooting
1
No rule to make target 'debian/certs/test-signing-certs.pem', needed by 'certs/x509_certificate_list'. Stop
Solve: comment/delete the corresponding config line.
This configure error occurs when building ffmpeg from with mp3 library (libmp3lame) enabled.
solution: add -lm to extra-libs, like this
123
./configure \
--extra-libs="-lpthread -lm"
...  # other configure options
Done!
HOW
Check ffbuild/config.log, which shows dynamic linking error of libmp3lame, which requires the math lib.
1234
util.c:(.text+0x96d): undefined reference to `__exp_finite'
util.c:(.text+0xa41): undefined reference to `__pow_finite'
layer3.c:(.text+0x2250): undefined reference to `sin'
layer3.c:(.text+0x226a): undefined reference to `cos'
'use strict';
console.log('# main starting');
const auth = require('./auth');
console.log('# in main, auth is');
console.log(auth);
console.log('start running...');
auth.authenticate('Alice');
运行结果
12345678910111213141516
# main starting
# in message: auth is
{}
# message loaded
# in user: message is
{ hello: [Function: hello] }
# user loaded
# in auth: user is
{ find: [Function: find] }
# auth loaded
# in main, auth is
{ authenticate: [Function: authenticate],
      enabled: [Function: enabled] }
start running...
found user: Alice
hello, Alice
# main starting
# in message: auth is
{}
# message loaded
# in user: message is
{ hello: [Function: hello] }
# user loaded
# in auth: user is
{ find: [Function: find] }
# auth loaded
# in main, auth is
{ authenticate: [Function: authenticate],
  enabled: [Function: enabled] }
start running...
found user: Alice
/xxxx/xxxxx/xxxxx/xxxx/message.js:8
    if (auth.enabled(name)) console.log('hello, ' + name);
             ^

TypeError: auth.enabled is not a function
# main starting
# in message: auth is
{}
# message loaded
# in user: message is
{ hello: [Function: hello] }
# user loaded
# in auth: user is
{ find: [Function: find] }
# auth loaded
# in main, auth is
{ authenticate: [Function: authenticate],
  enabled: [Function: enabled] }
start running...
found user: Alice
hello, Alice